




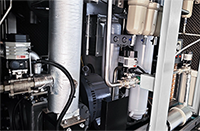



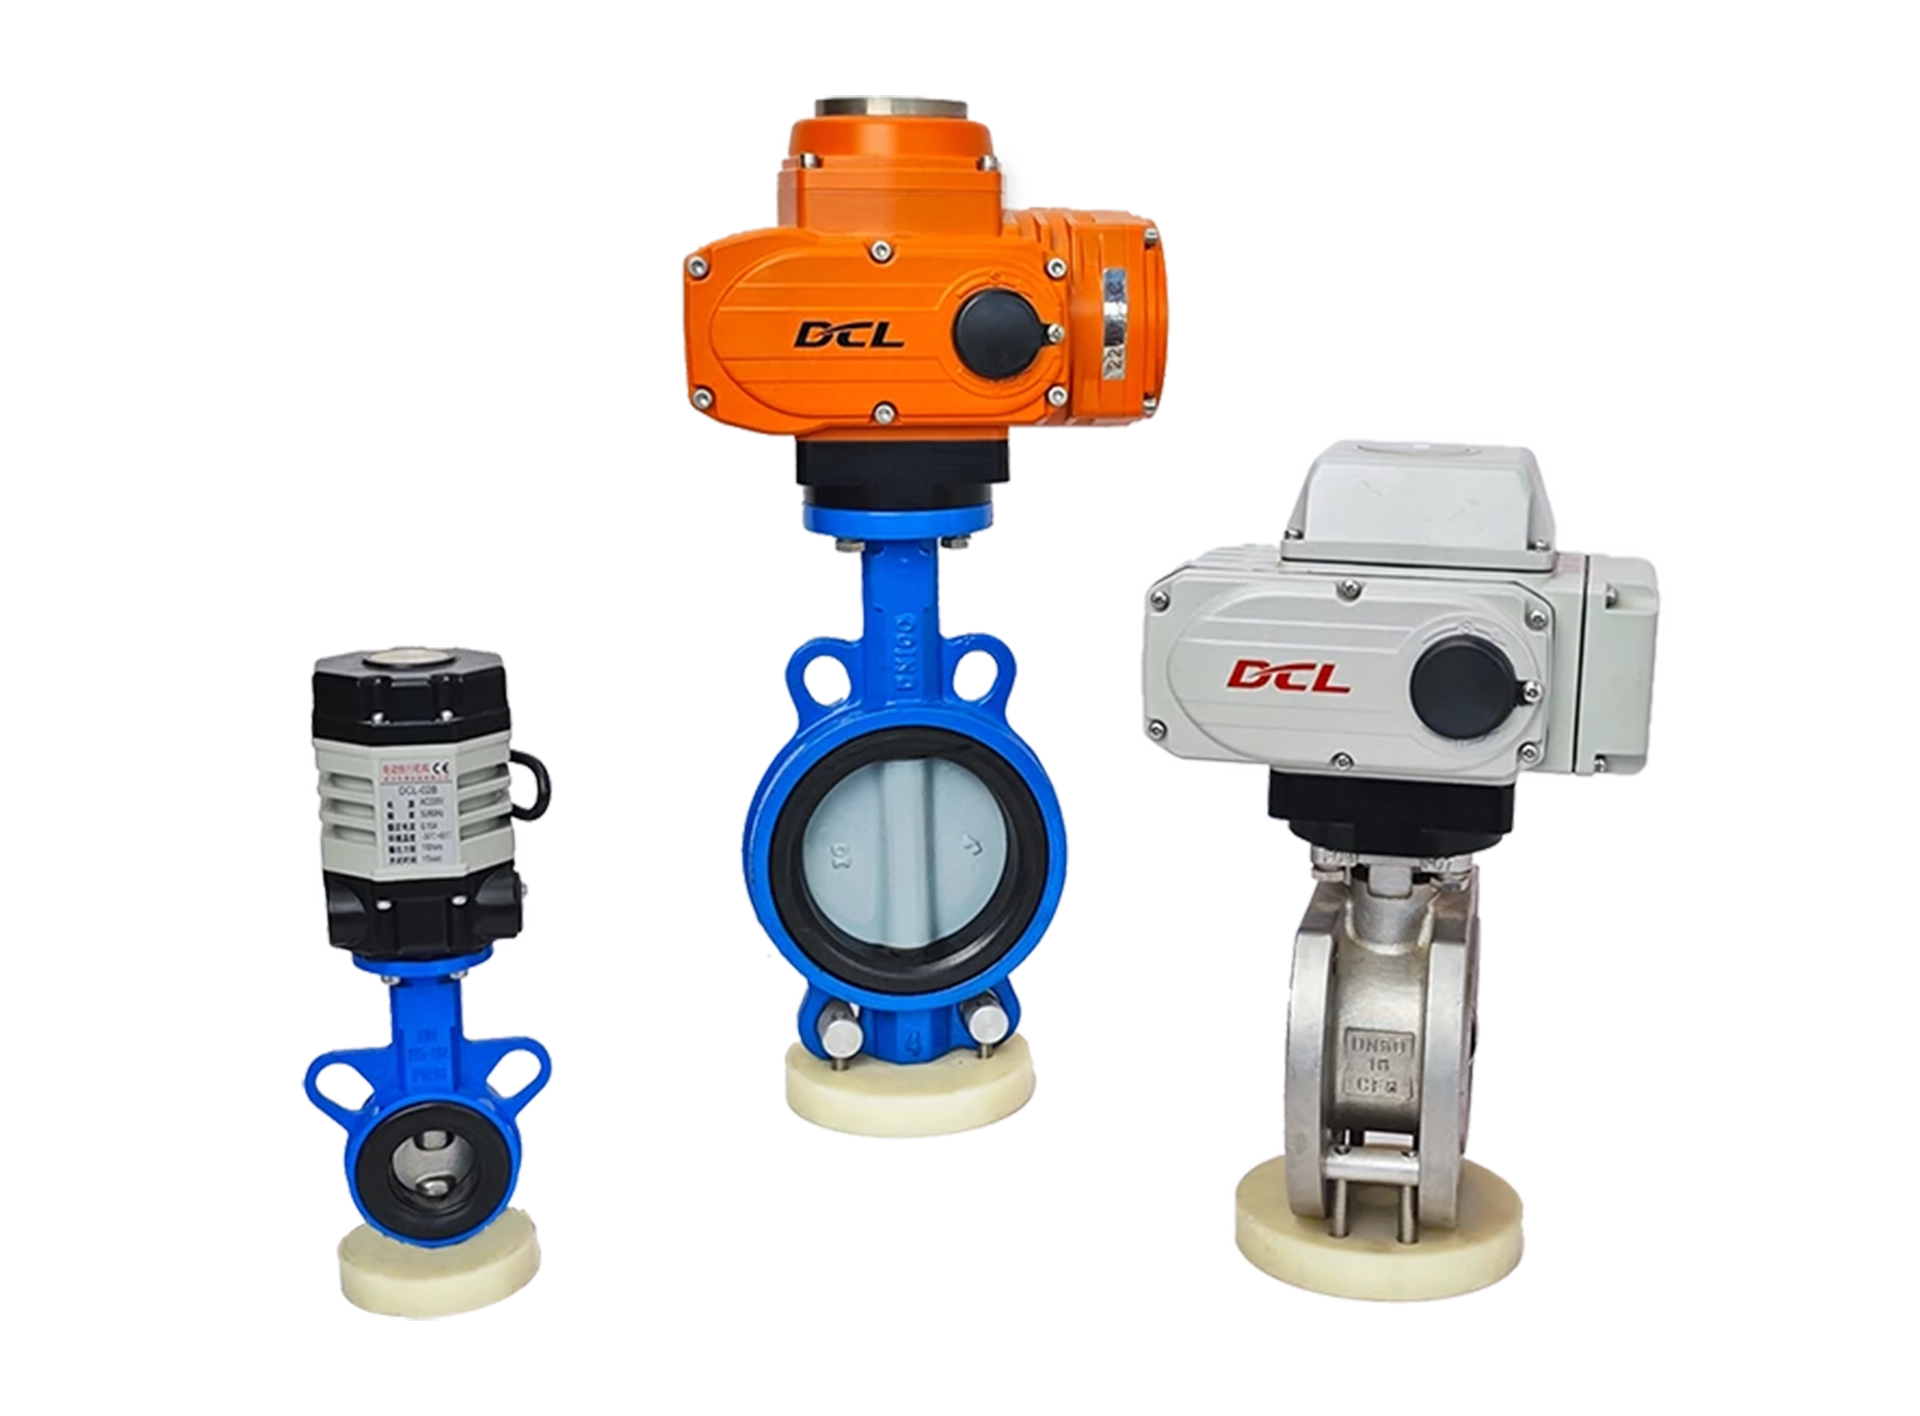
This guide applies to the switch-type actuators of the DCL explosion-proof series, standard series, and quick-open series. The models are as follows:
Weather-proof Actuator: DCL-05, DCL-10, DCL-20, DCL-40, DCL-60, DCL-100, DCL-160, DCL-250
Explosion-Proof Actuator: DCL-Ex05, DCL-Ex10, DCL-Ex20, DCL-Ex40, DCL-Ex60
Quick-Turn Actuator: DCL-K05, DCL-K10, DCL-K20, DCL-K40, DCL-K100
Common Faults and Troubleshooting Methods
| Fault | Possible Causes | Troubleshooting Methods |
|---|---|---|
| Actuator does not open or close at startup | 1. Incorrect wiring. 2. Incorrect power supply. 3. Faulty control switch or relay. 4. Control system mismatch. 5. Multiple actuators or actuator in parallel with other devices. | 1. Check the wiring against the actuator’s wiring diagram to ensure it is correct. 2. Verify power supply output voltage is ±10% of rated voltage, and the current is at least three times the actuator’s rated current. 3. Use a multimeter to measure input voltage at the actuator’s control terminal and confirm it matches expected values. 4. Use a mechanical switch to test actuator operation. If it works, verify the control system output logic. 5. Switch-type actuators should not be connected in parallel with other devices; use a single control circuit. |
| Actuator only opens or closes, not both | 1. Incorrect wiring. 2. Incorrect full open/full close cam settings. | 1. Use a mechanical switch to test actuator functionality. If it works, verify the control system output logic. 2. Check actuator’s wiring against the wiring diagram. 3. Adjust the cam settings according to the “How to Set Switch-type Electric Valves” manual. |
| Actuator stops in the middle of its stroke | 1. Valve is stuck. 2. Solid particles in the fluid medium causing valve blockage. 3. Incorrect full open/full close block settings. | 1. Check if the valve is stuck. Remove obstructions and retry after the actuator cools down from overload protection. 2. Inspect the fluid medium for solid particles. Remove any blockage and retry after cooling. 3. Adjust block settings according to the “How to Set Switch-type Electric Valves” manual. |
| Cannot turn the actuator with the handwheel | 1. Solid particles in the fluid medium causing valve blockage. 2. Valve is stuck. 3. Actuator’s reduction mechanism is damaged. | 1. Check fluid medium for particles causing blockage. Remove obstructions and retry after cooling. 2. Inspect valve for any stuck parts. Remove blockage and retry. 3. If actuator cannot be turned by hand, remove it from the valve. If it still doesn’t turn, replace with a new actuator. |
| No output from position feedback signal | 1. Incorrect switch wiring. 2. Incorrect full open/full close cam settings. 3. Overcurrent causing damage to the position feedback signal switch. | 1. Check wiring of the switch against the actuator’s wiring diagram to ensure it is correct. 2. Verify full open/full close cam is properly compressing the position feedback switch. 3. Measure the position feedback circuit to check if the switch is intact and properly connected. |
Please check if the operating conditions meet the parameter requirements.
Electric actuators may fail due to improper use or operating in incorrect conditions. To ensure long-term, trouble-free operation, the actuator must be used within the operating conditions specified in the product datasheet.
Power Supply Voltage: The supply voltage must be within the actuator’s rated operating voltage range. Overvoltage or undervoltage may reduce the actuator’s lifespan.
Power Supply Current: Since the motor’s starting current is significantly higher than the rated current, please ensure that the power supply can provide a current capacity at least 3 times the actuator’s rated current to ensure reliable operation.
Temperature: Ensure that the actuator operates within the rated temperature range. Operating the actuator outside the specified temperature range may cause malfunction, reduced lifespan, or eventual failure.
Environment: The DCL switch-type actuators are rated at IP67 for wind and rain protection. They are generally suitable for both indoor and outdoor use, providing protection against rain, splashes, and UV exposure (sunlight), which typically extends the product’s lifespan. Extremely corrosive environments may cause premature failure of electronic components. Do not use non-explosion-proof actuators in explosive atmospheres.
Duty Cycle: The duty cycle of the DCL switch-type actuator is 70% (42 seconds of operation per minute, with a required 18 seconds off). Exceeding a 70% duty cycle will trigger thermal protection for the motor.
Check if the wiring of the actuator is correct.
Ensure that all electrical connections are properly made according to the wiring diagram provided in the product manual. Incorrect wiring can lead to malfunction or damage to the actuator. Verify the following:
The power supply connections are properly secured and there are no loose wires.
The control signal wiring is correctly connected, ensuring polarity and signal type are properly matched.
The ground connection (if applicable) is properly established to avoid electrical hazards.
Double-check the connection of any external components, such as limit switches or feedback devices, to ensure they are wired correctly.
SEES - VÄLJAS
A - 2 aktiivse lõppasendi signaaliväljundiga
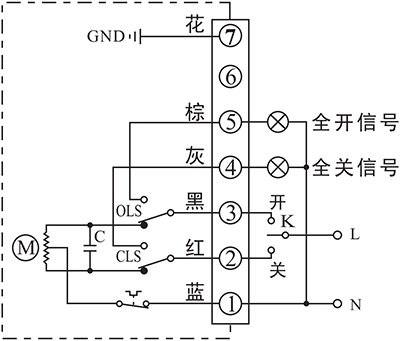
- Juhtige ajamit avamiseks või sulgemiseks K-ga
- Lõppasendi AVATUD/SULETUD väljundklemm saadab sündmuse 220 V vahelduvvoolu aktiivse signaalina, kui lõppasend on saavutatud.
Ühenduse üksikasjad:
- AC85-220V toitepinge neutraaljuhtme ühendamine P1-ga.
- Lülitage AC85-220V liin ventiili sulgemiseks asendisse CLOSE (P2).
- Ventiili avamiseks lülitage AC85-220V liin asendisse AVATUD (P3).
- P5 on AVATUD lõppasendi klemm, mis väljastab AC220V allikat, mida saab kasutada indikaatortule käivitamiseks, kui ajam on jõudnud avatud lõppasendisse.
- P6 on lõppasendi AVATUD klemm, mis väljastab AC220V allikat, mida saab kasutada indikaatortule juhtimiseks, kui ajam on saavutanud suletud lõppasendi.
- Ühendage maandus P7-ga.
B - Kahe passiivse lõppasendi lülitiga
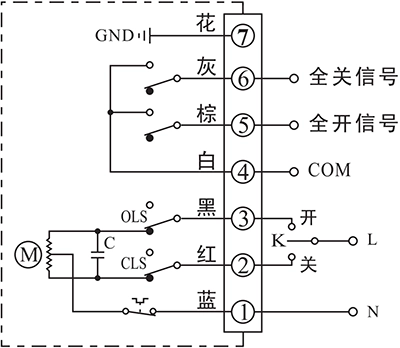
- Juhtige ajamit avamiseks või sulgemiseks K-ga
- Lõppasendi AVATUD/SULETUD väljundklemm saadab sündmuse passiivse signaali kujul, kui lõppasend on saavutatud.
Ühenduse üksikasjad:
- AC85-220V toitepinge neutraaljuhtme ühendamine P1-ga.
- Lülitage AC85-220V liin ventiili sulgemiseks asendisse CLOSE (P2).
- Ventiili avamiseks lülitage AC85-220V liin asendisse AVATUD (P3).
- P4 on lõppasendi AVATUD/SULETUD passiivse kontaktsignaali COM, mis on tavaliselt ühendatud signaaliga GND.
- P5 on AVATUD lõppasendi klemm, mis ühendatakse COM-iga, kui ajam on saavutanud avatud lõppasendi.
- P6 on lõppasendi CLOSE klemm, mis ühendatakse COM-iga, kui ajam saavutab suletud lõppasendi.
- Ühendage maandus P7-ga.
G - kahe lõppasendi lülitiga alalisvoolumootor
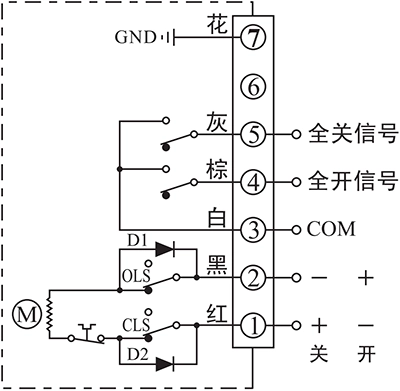
- Juhtige ajamit avama või sulgema toitepinge suuna abil klemmide 1 ja 2 vahel
- Lõppasendi AVATUD/SULETUD väljundklemm saadab sündmuse passiivse signaali kujul, kui lõppasend on saavutatud.
Ühenduse üksikasjad:
- Ventiili sulgemiseks ühendage DC24V+ P1-ga ja DC24V- P2-ga.
- Ventiili sulgemiseks ühendage DC24V+ P2-ga ja DC24V- P1-ga.
- P3 on lõppasendi AVATUD/SULETUD passiivse kontaktsignaali COM, mis on tavaliselt ühendatud signaaliga GND.
- P4 on AVATUD lõppasendi klemm, mis ühendatakse COM-iga, kui ajam on saavutanud avatud lõppasendi.
- P5 on lõppasendi CLOSE klemm, mis ühendatakse COM-iga, kui ajam saavutab suletud lõppasendi.
- Ühendage maandus P7-ga.
H - 3-faasiline 380 V vahelduvvoolumootor kahe lõppasendi lülitiga
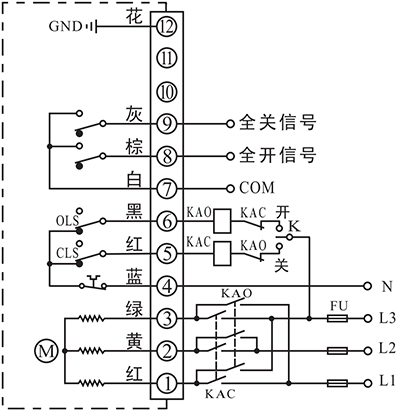
- Välise inverteri abil saab ajamit avada või sulgeda, et muuta toitepinge faasi.
- Lõppasendi AVATUD/SULETUD väljundklemm saadab sündmuse passiivse signaali kujul, kui lõppasend on saavutatud.
Ühenduse üksikasjad:
- Ühendades 3-faasilise AC380V inverteri väljundi P1, P2 ja P3-ga, saab ajamit juhtida ventiili avamiseks või sulgemiseks, muutes 3 faasi järjekorda.
- AC380V neutraaljuhtme ühendamine N(P4)-ga.
- P5-d kasutatakse koostööks välise lülitiga inverteri 3 faasi järjekorra juhtimiseks. See klemm ühendatakse N(P4)-ga, kui ajam ei ole SULETUD lõppasendis, ja lahutatakse N(P4)-st pärast seda, kui ajam on saavutanud SULETUD lõppasendi.
- P6-d kasutatakse välise lülitiga koostööks inverteri 3 faasi järjekorra juhtimiseks. See klemm ühendatakse N(P4)-ga, kui ajam ei ole AVATUD lõppasendis, ja lahutatakse N(P4)-st pärast seda, kui ajam on saavutanud AVATUD lõppasendi.
- P7 on lõppasendi AVATUD/SULETUD passiivse kontaktsignaali COM, mis on tavaliselt ühendatud signaaliga GND.
- P8 on AVATUD lõppasendi klemm, mis ühendatakse COM-iga, kui ajam on saavutanud avatud lõppasendi.
- P9 on lõppasendi CLOSE klemm, mis ühendatakse COM-iga, kui ajam saavutab suletud lõppasendi.
- Ühendage maandus P12-ga.
Sügavliikumine ja positsioneerimine
F - Positsioneerimisüksusega
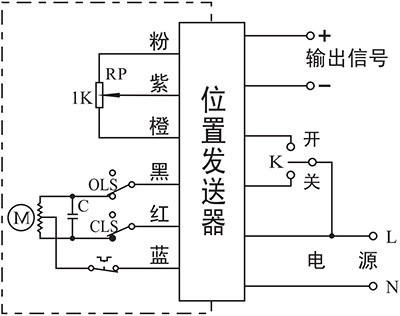
- Juhtige ajamit avamiseks või sulgemiseks K-ga
- Reaalajas klapi asend saadetakse välja 4-20 mA signaalina.
Ühenduse üksikasjad:
- Ühendage AC85-220V toitejuhe L-iga ja neutraal N-iga.
- Ventiili sulgemiseks lülitage AC85-220V liin asendisse CLOSE (P2).
- Ventiili avamiseks lülitage AC85-220V liin asendisse AVATUD (P3).
- Väljundi -/+ ühendamine süsteemiga, et saata välja reaalajas klapi asend.
C - 1KΩ/500Ω potentsiomeetriga
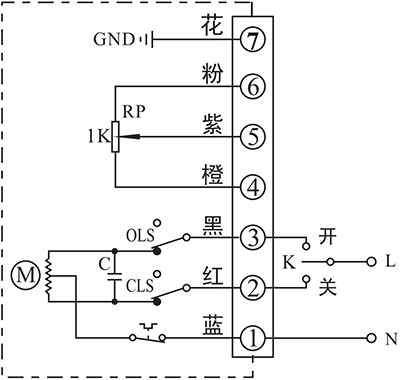
- Juhtige ajamit avamiseks või sulgemiseks K-ga
- Reaalajas klapi asend saadetakse välja potentsiomeetri takistusväärtusena.
Ühenduse üksikasjad:
- AC85-220V toitepinge neutraaljuhtme ühendamine P1-ga.
- Lülitage AC85-220V liin ventiili sulgemiseks asendisse CLOSE (P2).
- Ventiili avamiseks lülitage AC85-220V liin asendisse AVATUD (P3).
- P4 on potentsiomeetri madal pool, mis on tavaliselt ühendatud signaaliga GND.
- Juhtsüsteemi signaali sisendi ühendamine P5-ga. Takistuse väärtus P4 ja P5 vahel suureneb, kui ajam ventiili avab, samas kui takistuse väärtus P5 ja P6 vahel väheneb.
- P6 on potentsiomeetri kõrgeim pool, mis on tavaliselt ühendatud signaali toitega.
- Ühendage maandus P7-ga.
D - Potentsiomeetri ja lõppasendi tagasisidega
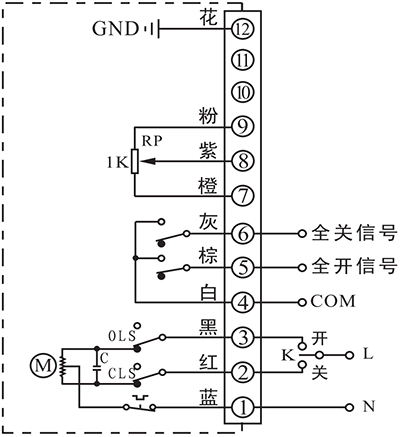
- Juhtige ajamit avamiseks või sulgemiseks K-ga
- Reaalajas klapi asend saadetakse välja potentsiomeetri takistusväärtusena.
- Lõppasendi AVATUD/SULETUD väljundklemm saadab sündmuse passiivse signaali kujul, kui lõppasend on saavutatud.
Ühenduse üksikasjad:
- AC85-220V toitepinge neutraaljuhtme ühendamine P1-ga.
- Lülitage AC85-220V liin ventiili sulgemiseks asendisse CLOSE (P2).
- Ventiili avamiseks lülitage AC85-220V liin asendisse AVATUD (P3).
- P4 on lõppasendi AVATUD/SULETUD passiivse kontaktsignaali COM, mis on tavaliselt ühendatud signaaliga GND.
- P5 on AVATUD lõppasendi klemm, mis ühendatakse COM-iga, kui ajam on saavutanud avatud lõppasendi.
- P6 on lõppasendi CLOSE klemm, mis ühendatakse COM-iga, kui ajam saavutab suletud lõppasendi.
- P7 on potentsiomeetri madal pool, mis on tavaliselt ühendatud signaaliga GND.
- Juhtsüsteemi signaali sisendi ühendamine P8-ga. Takistuse väärtus P7 ja P8 vahel suureneb, kui ajam ventiili avab, samas kui takistuse väärtus P8 ja P9 vahel väheneb.
- P9 on potentsiomeetri kõrgeim pool, mis on tavaliselt ühendatud signaali toitega.
- Ühendage maandus P12-ga.
Märkus:
- Katkendliku kasti sees olev vooluring on ajami sisemine vooluring. Väljas olev vooluring aga demonstreerib ajami elektriühendust.
- Kui teil on ühendusahela kohta muid erinõudeid, võtke julgelt ühendust meie tehnilise toega.


 English (UK)
 香港中文
 繁體中文
 English (Canada)
 English (South Africa)
 English (Australia)
 English (New Zealand)
 English
 Español de Puerto Rico
 Français du Canada
 Español de México
 Español de Chile
 Español de Colombia
 Español de Uruguay
 עִבְרִית
 Nederlands (België)
 Français de Belgique
 Eesti
 Latviešu valoda
 Lietuvių kalba
 Français
 Deutsch
 Norsk nynorsk
 Deutsch (Österreich)
 Slovenčina
 Deutsch (Schweiz)
 Italiano